 Save
Save The first time I served this cake, my guests literally gasped when they saw that golden pool of honey waiting in the center. I'd been experimenting with interactive desserts, trying to capture that moment when food becomes theater, and this honey-drip somehow nailed it in a way I hadn't expected. There's something about watching someone tear into a slice and immediately dip it into warm, flowing honey that makes the whole room feel a little more magical. That night, I realized I'd stumbled onto something special—not just because it tasted incredible, but because it gave people permission to play with their dessert.
I made this for my sister's birthday dinner, and what I remember most wasn't the cake itself but how my nephew, who usually skips dessert, demolished three slices. He kept saying he wanted more of the honey, and I watched my sister's face light up knowing that simple pleasure—a kid genuinely excited about what was on his plate—was worth every minute in the kitchen. That's when I understood this recipe isn't about showing off; it's about creating a shared moment.
Ingredients
- All-purpose flour (2 cups): The foundation that keeps everything tender—don't sift obsessively, just whisk it gently with the other dry ingredients to break up any clumps.
- Baking powder and baking soda (1½ tsp and ½ tsp): This duo ensures the cake rises evenly without becoming too airy or dense; don't swap one for the other.
- Salt (¼ tsp): A tiny pinch that makes the honey taste even more honey-forward and balances the sweetness beautifully.
- Unsalted butter and granulated sugar (½ cup each): Creaming these together for a full 2-3 minutes creates the light, fluffy base that makes this cake so tender.
- Honey (½ cup for cake, plus 1 cup for serving): Use a high-quality variety like wildflower or acacia if you can—the cake honey infuses every crumb, while the serving honey should be something you'd feel proud drizzling over something special.
- Eggs and vanilla (3 large, 1 tsp extract): These bind everything together and add richness that keeps slices moist for days.
- Whole milk (¾ cup): Added alternately with dry ingredients, it loosens the batter to the perfect consistency—not too thick, not too thin.
- Heavy cream and mascarpone (1 cup and ¼ cup): This combination creates a honey cream that's luxurious without being heavy, holding its shape while staying spoonable.
- Toasted almonds (¼ cup chopped): Their crunch and subtle nuttiness play beautifully against the silky honey layers.
Tired of Takeout? 🥡
Get 10 meals you can make faster than delivery arrives. Seriously.
One email. No spam. Unsubscribe anytime.
Instructions
- Set your stage:
- Preheat your oven to 350°F and take a moment to grease and line two 8-inch round pans—this step saves you from heartbreak later. Having everything prepped before you start mixing is the difference between a smooth bake and a frantic one.
- Build your dry foundation:
- Whisk together flour, baking powder, baking soda, and salt in one bowl, breaking up any flour clumps as you go. This aerates everything and ensures even leavening throughout the cake.
- Cream butter and sugar into clouds:
- Beat softened butter with granulated sugar for a full 2-3 minutes until the mixture looks pale, fluffy, and almost mousse-like. This is where the cake gets its tender crumb, so don't rush it.
- Incorporate honey, eggs, and vanilla:
- Add honey, then eggs one at a time, beating well after each addition, then finish with vanilla. The mixture might look slightly curdled—that's normal and fine.
- Marry wet and dry ingredients:
- Alternate adding dry ingredients and milk to the wet mixture, starting and ending with dry, mixing just until combined. Overmixing at this stage creates a tough cake, so stop as soon as you see no flour streaks.
- Divide and bake:
- Pour batter evenly between your prepared pans and slide them into the oven for 22-25 minutes, until a toothpick inserted in the center comes out clean. The cakes should spring back gently when touched and smell absolutely incredible.
- Cool with patience:
- Let cakes cool completely in their pans before turning out—rushing this step can cause them to break apart. Once cool, you can wrap them and even refrigerate overnight if needed.
- Whip honey cream to silk:
- Whip heavy cream to soft peaks, then add honey and mascarpone, whipping just to stiff peaks. The mascarpone keeps this filling from becoming too stiff, maintaining a lovely spoonable texture.
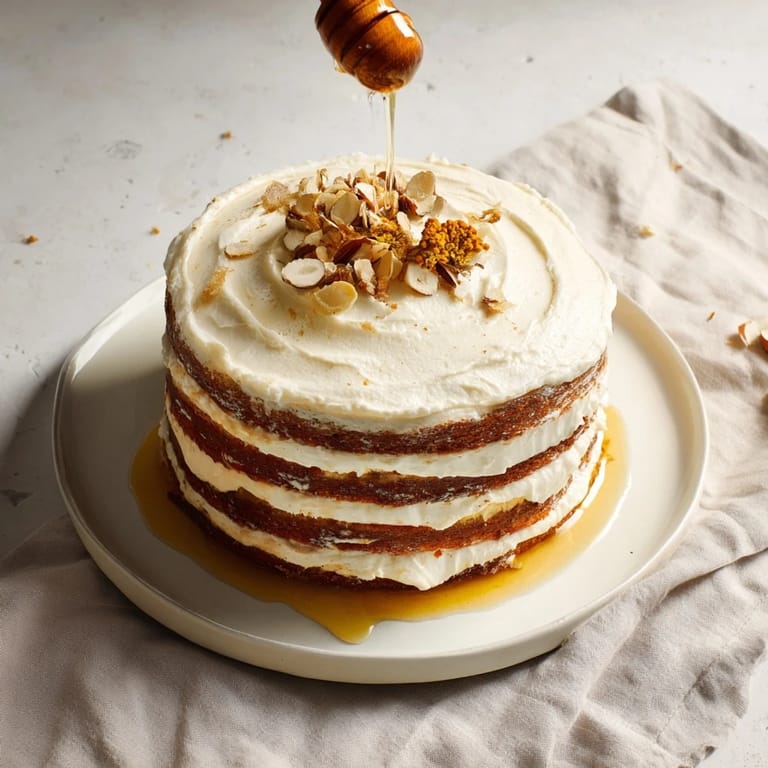
- Slice and layer with care:
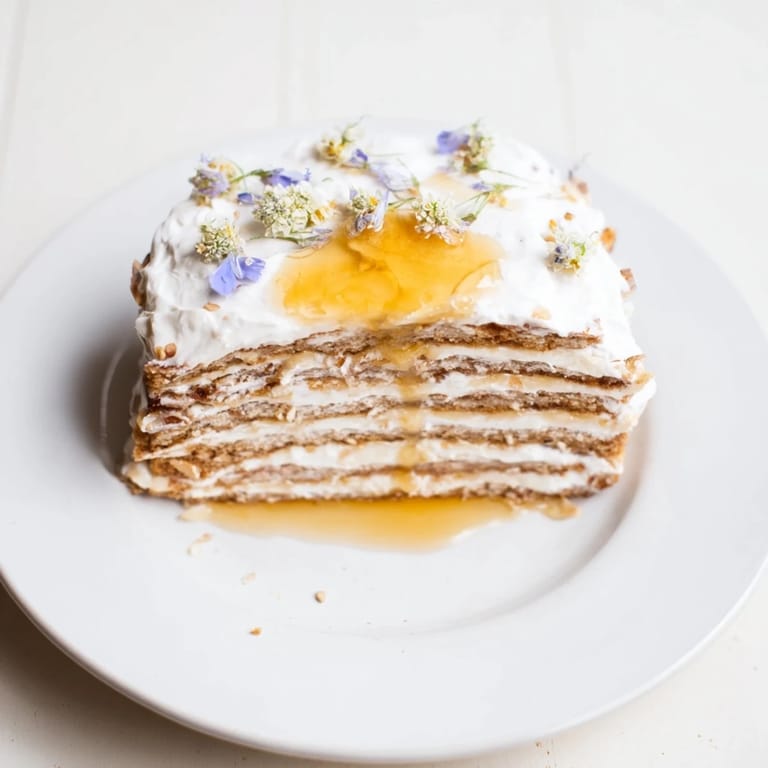
- Slice each cooled cake horizontally to create four thin layers total, then build your stack on a serving platter: layer, honey cream, layer, honey cream, and so on. The filling should be thick enough to hold everything steady but not so thick that it squishes out.
- Cut the honey well:
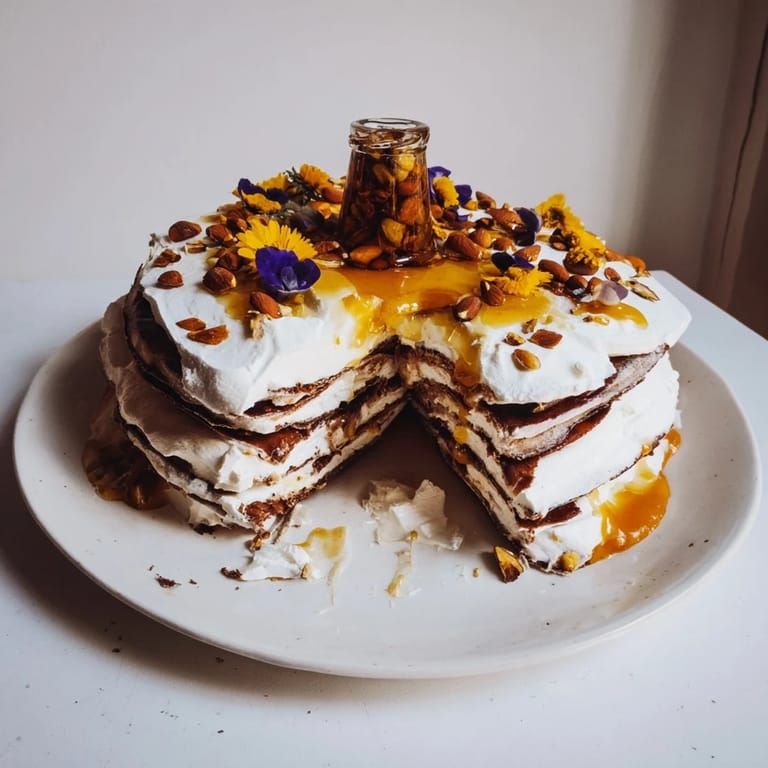
- Using a 3-inch round cutter, carefully cut a hole from the center of your stacked cake—work gently to avoid crumble drama. You're creating a little nest for the magic to happen.
- Seat your honey pot:
- Place a small glass or ceramic honey pot (about 3 inches wide) into the hole you've created and fill it generously with your best liquid honey. This is your showstopper, so make sure the pot sits level and stable.
- Dress it up:
- Scatter toasted almonds over the top, add edible flowers if you're feeling fancy, and drizzle a little extra honey as a final touch. The cake is now ready to dazzle.
 Save
Save What surprised me most about this cake wasn't how it looked on the plate, but how it changed the rhythm of dessert. Instead of everyone quietly eating, suddenly there was conversation, laughter, people asking their neighbors if they'd tried dipping yet, comparing drizzles and bites. A dessert that brought people together rather than just ending a meal—that felt like winning.
Choosing Your Honey
The honey you choose is truly the main character here, so don't treat it as an afterthought. Wildflower honey has a beautiful complexity that plays well with the cake, acacia honey is mild and lets the cream shine, and if you're feeling adventurous, try orange blossom or lavender honey for unexpected floral notes that guests will be talking about for weeks. Visit a local honey producer or specialty market if you can—good honey should taste like something, not just sweetness. I once made this with a dollar-store honey and regretted it immediately; the cake tasted flat and forgettable. Spending a little more on one ingredient that's literally the star of the show is the best decision you can make.
Make-Ahead Magic
This dessert is surprisingly forgiving if you plan ahead. Bake the cake layers a day in advance and wrap them tightly—they'll actually stay moister overnight. The honey cream can be made several hours ahead and kept chilled, and you can even assemble the whole cake up to 4 hours before serving, keeping it refrigerated until guests arrive. The only thing you want to do last-minute is fill that center honey pot, as it's most dramatic when it's still warm and pourable. I've found that giving yourself this flexibility makes hosting so much less stressful, because the hardest part is genuinely done before anyone rings the doorbell.
Serving Suggestions and Pairings
This cake genuinely deserves a partner to make the moment complete. A glass of Moscato or late-harvest Riesling beside each plate adds sophistication without overwhelming the honey flavors—both wines have just enough sweetness to dance with the cake rather than compete. If you're serving this warm, a scoop of vanilla ice cream melting into those honey-dipped bites is absolute heaven. For a casual gathering, strong black coffee cuts through the richness beautifully, while herbal tea feels elegant and a little different. I've even served this at brunch with a splash of prosecco on the side, and that combination somehow made everyone feel like they were at a little celebration. Whatever you choose, remember that the cake is already the star—the sides just need to be respectful and supportive.
- A small spoon with each slice helps guests scoop honey directly without making a mess.
- Keep warm honey nearby for anyone who wants to drizzle more partway through eating.
- Serve this cake on a beautiful platter that can go straight to the table—it's too gorgeous to keep in the kitchen.
 Save
Save This cake taught me that the best desserts aren't always the most complicated—sometimes they're the ones that make people smile before they even take a bite. The honey-drip isn't just something to eat; it's a little moment of joy you get to hand someone you care about.
Recipe Questions & Answers
- → What type of honey works best for this cake?
Wildflower or acacia honey is ideal for the central honey pot, offering natural sweetness and floral notes that complement the cake layers well.
- → Can I substitute mascarpone in the honey cream filling?
Yes, cream cheese or ricotta can be used as a substitute to maintain richness, though mascarpone offers the creamiest texture.
- → How do I assemble the layers without breaking the cake?
Slice cooled cakes gently into thin layers using a serrated knife, then stack carefully with honey cream spread evenly to support the layers.
- → Is there an alternative to almonds for garnish?
Chopped pistachios or toasted pecans can be used as nut alternatives, or omit nuts entirely for a nut-free version without sacrificing crunch.
- → How should the central honey pot be served?
Use a small glass or ceramic container filled with warm honey placed in the center cut-out; guests can dip bites for an interactive experience.